- VinylWorks4u
- 520-483-1527
- www.vinylworks4u.com
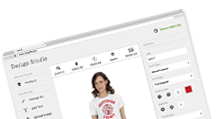
Adding text to a design is easy. Simply Click on the “Add Text” button in the Design Studio. This will cause an “Insert Text Here” window to open where you can type the text you want to appear on the garment.
To edit text on a design, first select the text by clicking on it. This will cause the properties of the text to appear to the left of the design. You can change the text, font, color, spacing, etc., from the properties box.
To add Clip Art to your design, start by clicking on the “Clip Art” button in the Design Studio. A list of Clip Art categories will appear. Click on a category and the clip art for that category will appear. Click on the desired Clip Art and it will appear on your garment. You can now move, resize, rotate and align your Clip Art. You can also upload your own Clip Art by clicking the “Upload Image” button in the Design Studio.
To edit artwork on a design, first select the artwork by clicking on it. This will cause the properties of the image to appear to the left of the design. You can change the art, direction or color from the properties box.
To remove art or text from your design, click on the element you wish to delete on the template image or in the layers section. This will select the elements layer. Click on the “Delete” button to delete the element from your design.
To adjust the order of the layers, click on the “Edit Layers” button in the Design Studio. Select the layer of that element in the layers section. Click on the up or down arrow in the layers section to move that layer up or down in the stack.
To make the art or text in a design bigger or smaller, start by clicking on the element you want to resize. When an element is selected, white boxes (handles) appear on the corners of the outlined element. By clicking on one of the white handles and holding the mouse button down, you can move the mouse to scale the element.
To change the position of a design on a garment click on design or element in a design. This will select that design or element. Simply hold the mouse button down and move the design or element to a new location on your garment.
Unless you have used a PO, your order will not be shipped without full payment. We do require resolution of any payment issues (e.g. additional garment or ship costs, bad payment information) before we ship your order. We will always contact you if there is a problem.
In some cases, yes. Contact customer service with your order number.
We expect your order to be shipped to you in approximately 10 days or less from the date of your order. Note: Processing times must be added to shipping times. We cannot ship to PO boxes.
Unless you have used a PO, your order will not be shipped without full payment. We do require resolution of any payment issues (e.g. additional garment or ship costs, bad payment information) before we ship your order. We will always contact you if there is a problem.
Unless you have used a PO, your order will not be shipped without full payment. We do require resolution of any payment issues (e.g. additional garment or ship costs, bad payment information) before we ship your order. We will always contact you if there is a problem.
If the status of your order is PENDING AUTH, this simply means your order is being processed through our order authorization system. If we need any additional information from you in regard to your order, we will contact you via phone or email.
Yes. If you have your previous order saved in your Saved Designs section you can reorder in a few simple steps.
In the Shopping Cart, there is an option next to each garment. Click the “ADD NOTES” link. This opens a window that will allow you to add notes and instructions for that garment.
Yes. You can add shirts to your order but there is a small window of opportunity to make changes. The sooner you let us know of additional sizes, the better. We recommend contacting your customer service rep by the second or third business day at the latest. You cannot add shirts to rush orders. Adding shirts may delay the production time of your order.
Yes. If you have your previous order saved in your Saved Designs section you can reorder in a few simple steps.
In the Design Studio, there are two ways to accomplish this. 1) Click the “PRODUCTS” button. This will activate a products cover flow where you can select different garment options. 2) Click the “PRODUCTS” link in the header bar. This will take you to the Product Categories where you can select products and add designs.
Unfortunately there are no standardized industry specifications or measurements. However, the following rule-of-thumb applies.
| Men”s |
| Size | XS | S | M | L | XL | 2XL | 3XL | 4XL | 5XL | 6XL |
| Chest | 30-32″ | 34-36″ | 38-40″ | 42-44″ | 46-48″ | 50-52″ | 54-55″ | 57-58″ | 60-61″ | 63-64″ |
| Length | 25″ | 27″ | 29″ | 30″ | 31″ | 33″ | 34″ | 35″ | 36″ | 37″ |
|
Junior Fit Ladies – Slim cut through body and sleeves. Fitted shirt. |
||||||||||
| Size | S | M | L | XL | XXL | Plus 1X | Plus 2X | |||
| Chest | 28″ | 30″ | 32″ | 34″ | 36″ | 41″ | 46″ | |||
| Length | 25″ | 26″ | 27″ | 28″ | 29″ | 30″ | 31″ | |||
|
Youth |
||||||||||
| Size | XS (2-4) | S (6-8) | M (10-12) | L (14-16) | XL (18-20) | |||||
| Chest | 27″ | 31″ | 34″ | 36″ | 40″ | |||||
| Length | 18″ | 20.5″ | 24″ | 26″ | 27.5″ | |||||
Yes. If you have your previous order saved in your Saved Designs section you can reorder in a few simple steps.
The best option is to upload your artwork using an image format that supports transparency such as .PNG, .PSD or .GIF. If this is not an option, please add a note from the shopping cart saying you would like our artists to remove the box for you.
Sign In using your email address and password. Click the “MY ACCOUNT” link in the header bar. Click “MY DESIGNS” in the left menu. From here, choose the design you want to edit and click the yellow “CUSTOMIZE IT” button. This will take you to the Design Studio where you can edit and save your design.
In the Design Studio, click the “UPLOAD IMAGE” button. The following file types are supported: .PNG, .GIF, .JPG, .BMP, .TIF and .PSD.
In the Shopping Cart, there is an option next to each garment called “ROSTER COUNT”. Fill in the number of players on your roster and click the “ADD NAMES & NUMBERS” link. This opens a window that will allow you to add player names and numbers.
In the Design Studio, click on “PRODUCT VIEWS” and “BACK”. Once you have done this, select the “FULL” option. You can now design on the back of your garment.
Go to the Design Studio. Begin by clicking the “ADD TEXT” button or the “CLIP ART” button. You can now create a custom garment using our wide selection of fonts and clip art.